Assign Credits to Warrant Function
The Assign Credits to Warrant function enables you to review and assign all of your outstanding credits in a single dialog box, without the need to flip back and forth between the Receipts and the Receivables tabs as you would do when assigning a single credit.
To Assign Credits to Warrant choose Utilities | Assign Credits To Warrant. As the dialog box loads, it will display all of the outstanding credits down the left side of the window.
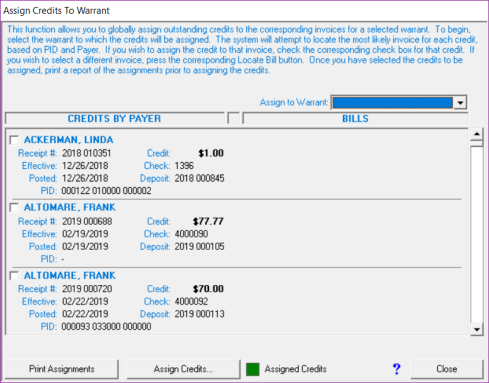
When Assigning Credits to Warrant, you can change the sort order by which the credits are displayed. They can be sorted by Payer Name, by PID, or by Receipt Number. The system defaults to displaying them alphabetically by Payer Name. To change the sort order, click on the heading Credits By Payer. This will display the Credit Sort Order dialog box. Click on the radio button next to the option you want and select OK. The credits will now display in the order you requested.
Use the scroll bar on the right to see the entire list. Initially, the credits are not matched or assigned to any invoices. To begin the process, select the warrant to which you want to assign the credits using the Warrant drop down box. Generally this will be the warrant that you just imported and for which you are preparing to print tax bills. However, it could be any warrant in the database. Once you have selected the warrant, the system will review each outstanding credit and attempt to locate the most likely invoice on that warrant to which the credit should be applied. This decision will be made based on the way in which your database has been configured, but typically it will first try to match the PID that may have been associated with the credit to the PID of an invoice on the warrant. If no possible match is made for a credit based on PID, it will then attempt to match invoices by comparing the payer name from the credit with the owner name on the invoice. Regardless of the method used, if the system makes a potential match for a credit it will display the corresponding invoice information to the right of the credit information. If no possible match can be identified, it will indicate "No Unpaid Invoice Found."
Once the system has suggested possible invoice matches for your outstanding credits, it is up to you to scroll through the list of possible matches to finalize or revise any credit assignments. Note that the system will make suggestions and make it easier for you to assign the credits, but the final decision is still up to you. Use the scroll bar to review the list of credits and possible assignments. If the system has suggested a possible credit/invoice match with which you agree, use the check box to the left of the credit payer's name to indicate that you wish to assign the credit to the displayed invoice. Post-Its associated with both receipts and with parcels (via the invoices selected) will display the Post-It icon. You can click on the corresponding Post-It icon to display the actual Post-It and flash Post-Its will display automatically when you choose to assign a credit to the corresponding invoice.
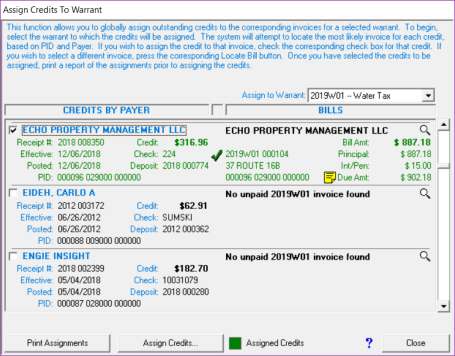
If the system has suggested a possible credit/invoice match with which you disagree, you can simply leave the corresponding check box unchecked and the credit will not be assigned to any invoice. Alternatively, you can use the Locate Bill button to the far right of each credit to select the correct invoice for the credit.
Once you have manually located an invoice for the credit, make sure to check the corresponding check box to indicate you wish to assign the credit to the bill you just found. Finally, if the system has not suggested a possible credit/invoice match you can also use the Locate Bill button to the far right of each credit to select the correct invoice for a credit.
When you check the credit assignment check box, the system will calculate the payment that will be made to the invoice. Typically, you will be using this function to assign credits prior to printing bills so there will not be any interest due on the invoices. However, if you are using this function after the due date of the selected warrant has passed, the system will calculate any interest due based on the effective date of the credit. Thus, if the credit was received last year and you are just assigning it today, three weeks after the due date of the invoice, the system will not charge any interest during the assignment of the credit because you have had the tax payer's money since long before the bill due date. To see the interest date used by the system, hold your cursor over the Interest/Penalties amount for the invoice.
Once you have reviewed the credit/invoice assignments and indicated the credits you wish to assign, using the corresponding checkbox, you must print a report of the matches using the Print Assignments button. After you have printed the assignment report, press the Assign Credits button to assign the selected credits to the corresponding invoices.
There are a few additional items worth noting for the Assign Credits To Warrant function:
- The system will prevent you from assigning more than one credit to a single invoice at one time. For example, imagine a tax payer who makes weekly prepayments of $50.00 for 12 weeks prior to the issuance of the property tax warrant. By the time the tax bill is imported, the tax payer will have 12 outstanding credits, each in the amount of $50.00. If these credits are all to be assigned to a single property tax invoice, you will need to either do it manually (see Assign Credit to Receivables) or you will need to use the Assign Credits To Warrant function recursively to assign the subsequent credits. In any event, the system will warn you when you are trying to assign more than one credit at a time to a single invoice and prevent you from doing so.
- You can only assign outstanding credits to one individual warrant at a time, but you can recursively use the Assign Credits To Warrant function. For example, if you import a water warrant and a sewer warrant at the same time, you will have to select one of the warrants first. Then indicate the credits you wish to assign, print the assignments, and assign the credits. Once you are done with the first warrant, the system will refresh the list of outstanding credits and if there are any remaining you can immediately select the second warrant and proceed with assigning the remaining credits.
- You cannot save the credit assignment selections you have made without actually assigning them. That is, if you start the process, select a warrant, carefully review the credit assignments, and then somebody comes to the window to pay their taxes and you close out of the Assign Credits To Warrant function, you will need to restart the process again. The system will warn you when you are about to discard any assignment information.
- This function is not available in towns in which discounts are given for early payment. In this situation, credits must be assigned manually as there are a number of other factors involved when discounts are provided (see Assign Credit to Receivables).
This process should be used as a guideline, and not as a replacement for understanding the process.
-
Print Unassigned Credits report:
-
Reports | Credits | Unassigned | All
-
-
Assign Credits:
-
Utilities | Assign Credits to Warrant
-
Choose the warrant from dropdown menu.
-
Choose the credits you wish to assign to which invoices. Note: Each parcel can only have ONE credit assigned at a time.
-
Select Print Assignments. Note: You do not have to actually print this report, but you do have to open it in order to be able to assign the credits.
-
Select Assign Credits.
-
Continue until all credits you want to assign have been assigned. NOTE: If you have a customer who pays monthly, and you have multiple credits to assign, this process would be time-consuming. You can assign their credits manually (see Assign Credit to Receivables), and in chronological order.
-
-
Print Assigned Credits report:
-
Reports | Credits | Assigned to | Receivables | By Assigned Date (Select from today to today).
-
* Once this process is complete, you may continue on to Print Tax Bills.